

In our first article you will learn how to: install a Mac OS X Leopard theme, install MAC OS X Mouse Pointers, add MAC OS X wallpapers, add the MAC OS X Back and Forward buttons and how to customize the Welcome Center to be as MAC like as possible.
IMPORTANT: Before starting this procedure you should log on as an administrator. If your user is not administrator, the procedure will fail.
If User Account Control (UAC) is enabled, you will be asked for permission each time you copy files to important Windows folders such as the ones mentioned below. Each time it shows up, click on Continue and the files will be copied over.
Before starting this procedure, it is recommended to create a System Restore snapshot. In case of failure, it will be very easy for you to revert back to the initial state.
Also, keep in mind that this tutorial is published with no warranties. We are not responsible for any problems you might have with your system. We tested everything multiple times on two separate computers and we did not encounter any problems. However, this is not a warranty that the procedure will work the same on all computers & configurations.
How to install a Mac OS X Leopard theme
First, we will show you where to find and how to install the Mac OS X Leopard theme in Windows
Go to deviantART and download the 'ZEUS OS X : SPIRIT OF LEOPARD' theme.
When the download of the file has been completed, extract the archive file. Inside you will find other archives with different styles, wallpapers, buttons and cursors.

Before you move on, it is best to read our guide called Pimp My Windows Vista: How to install new themes. Read carefully and follow all the instructions mentioned there, including the installation of the VistaDeskHack tool.
After you have followed all the steps detailed in the above mentioned article, you will have to copy the theme style files found in the archive you just downloaded to the Themes folder of Windows Vista.
In the ZEUS_OS_X archive you will find two other archives with theme styles: AGE OF TECHNOLOGY LEOPARD STYLE VISTA VISUAL STYLES.zip and SPIRIT OF LEOPARD VISTA VISUAL STYLES.zip. Extract the contents of these archives and copy it to 'C:\Windows\Resources\Themes'. Be careful not to copy the main folder from each archive. You need to copy all the subfolders with themes such as 'ZEUS os X gray leopard' from the first archive or 'ZEUS os X Uranos' from the second archive.

Both archives have a folder named 'Dionisos riding leopard X'. You will be asked if you want to merge the folders. Click No.

The final step is to apply the themes you have installed. To do this, right click anywhere on your desktop, click on Personalize and then on Windows Color and Appearance. Next, click on 'Open classic appearance properties for more colors options'.

POSSIBLE PROBLEM: When clicking on Windows Color and Appearance, if you don't see the the window shown above, please read the end part of this article and learn how to fix this.
If everything is ok with the Windows Color and Appearance window, browse through the themes you have just installed, select the one you want to use and click on Apply.
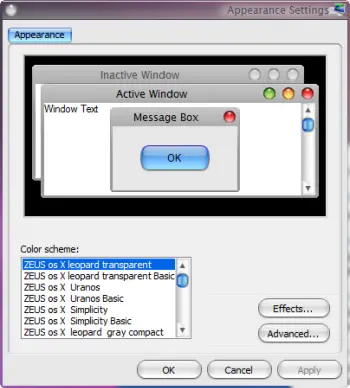
Feel free to browse through all the themes until you find the one you like most.
How to install MAC OS X Mouse Pointers
In the ZEUS_OS_X archive you downloaded earlier you will find a file called 'OS X Cursors.zip'. Unpack it and remember the location where you extracted all the files contained in it.
Next, right click on your Desktop, select Personalize and then 'Mouse Pointers'.

In the Mouse Properties window, go to the Pointers tab. Select 'None' in the Scheme section and click on Apply.

Now, go to the Customize section, select the first pointer (Normal Select), click on Browse, navigate to the folder where you extracted the MAC OS X cursors, select the first one (1. Normal Select.cur) and click on Open.

The Normal Select cursor will now be replaced with its MAC OS X version. To change all cursors repeat this procedure for each of them.
The MAC OS X mouse pointers are numbered from 1 to 15, in the exact order you will see them in the Customize section. Below is a list with the text of the pointers and their Mac OS X image correspondent.

When you have finished with all of them, click on 'Save as', type a name for this scheme, for example 'Mac OS X', and then click OK.

How to add MAC OS X wallpapers
In the ZEUS_OS_X archive you will find another archive called WALLPAPER.zip. Extract its contents, then right click anywhere on your Desktop, click on Personalize and then on 'Desktop Background'.

In the Desktop Background window, click on Browse, go to the location where you extracted the WALLPAPER.zip file and select the wallpaper you like most.

Then, choose how the wallpaper will be positioned and click on OK.
How to add the MAC OS X Back and Forward buttons
If you want to further customize your theme, you can also install some MAC OS X specific Back and Forward buttons. You can find them in the BUTTONS STYLES.zip file from the ZEUS_OS_X archive. Once you extract them, you will find three folders. The buttons look as shown in the screenshot below:

Each folder has a picture with how the buttons look like and a file called browseui.dll.
In order to change the Windows Vista default Back and Forward buttons you will need to overwrite the file browseui.dll with one from the above mentioned folders. The file can be found in 'C:\Windows\System32'.
Open Windows Explorer and navigate to this folder. Here search for the file browseui.dll and take ownership of this file. If you don't know how to do this, read our guide called Change the permissions and take ownership of your files and folders.
Once you've done this, rename the default browseui.dll to browseui.dll.old and copy the browseui.dll file that your prefer from the three versions mentioned above. In order for the new buttons to be applied, restart your Windows Vista.
NOTE: If you did not take permissions of the file before copying it, the procedure will fail.
How to add the MAC OS X Welcome Center
Another thing you can change using the content from the ZEUS_OS_X archive is the look of the Windows Vista Welcome Center. To do this, first extract the 'WELCOME CENTER.zip' file. Inside you will find a file called oobefldr.dll.
Now go to 'C:\Windows\System32' and take ownership of the oobefldr.dll file found there. If you don't know how to do this, read our guide called Change the permissions and take ownership of your files and folders.
Once you've done this, rename the default oobefldr.dll to oobefldr.dll.old and copy the oobefldr.dll you just extracted to 'C:\Windows\System32'.
Now, restart your Windows Vista and enjoy the new Welcome Center.

NOTE: If you did not take permissions of the file before copying it, the procedure will fail.
We will stop here with our first article from this series. In the next few days we will continue publishing other tutorials in which you will learn how to: add a MAC OS X boot & logon screen, install MAC OS X icons, install a MAC OS X dock, move the titlebar icons from right to left as in MAC OS X and how to simulate the ALT-TAB behavior from MAC OS X. Stay tuned!


0 comments:
Post a Comment